single.phpは投稿、page.phpは固定ページを出力する際に参照されるサイトの要とも言えるテンプレートです。
WordPressでは、テンプレートに要素を追加することで、タイトル・本文を初めとしてカテゴリや投稿日・タグ・アイキャッチ画像など、投稿ごとに設定されている様々な情報を自由に出力することができます。
WordPressテーマ作成4では、WordPressテーマの中で一番重要だと言っても過言ではない投稿と固定ページの基本的な作成方法をご紹介します。
※本記事は、基本的なsingle.phpの作成方法についてご紹介しています。SNSボタンや関連記事・広告などを出力する方法は、別途個別にご紹介しておりますので、カテゴリ『WPカスタマイズ』を参照してください。
single.phpに投稿の各要素を追加する
今回は、最もスタンダードな『タイトル』『投稿日』『カテゴリ』『コンテンツ』『タグ』『投稿の著者』で構成されている投稿ページを作成します。
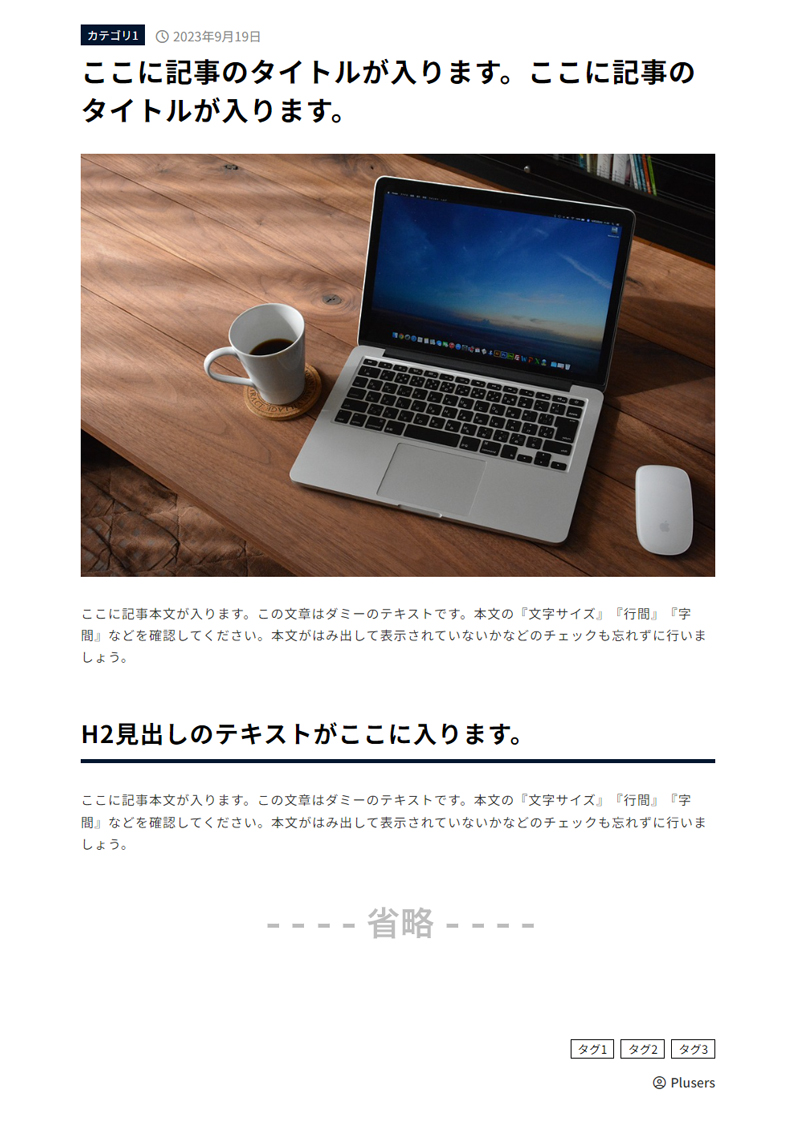
『WordPressテーマ作成2』で作成したデザインをベースに、single.phpに投稿に表示する要素を追加します。
single.phpのdiv class=”contents”の下に記述
<?php if(have_posts()): the_post(); ?>

  <article <?php post_class('article-content' ); ?>>

    <div class="article-head">

      <div class="article-info">
        <!--カテゴリ取得-->
        <?php if(has_category()): ?>
          <div class="article-cat">
           <?php echo get_the_category_list(' '); ?>
          </div>
        <?php endif; ?>

        <!--投稿日を取得-->
        <time class="article-date" datetime="<?php echo get_the_date('Y-m-d'); ?>">
          <i class="material-symbols-outlined">schedule</i>
          <?php echo get_the_date(); ?>
        </time>
      </div>

      <!--タイトル-->
      <h1><?php the_title(); ?></h1>

      <!--アイキャッチ取得-->
      <div class="article-img">
        <?php
        if(has_post_thumbnail()) {
          the_post_thumbnail('large');
        }
        ?>
      </div>

    </div>

    <div class="article-main editor-content">
      <!--本文取得-->
      <?php the_content(); ?>
    </div>

    <div class="article-foot">
      <!--タグ-->
      <?php if(has_tag()): ?>
        <div class="article-tag">
        <?php the_tags('<ul><li>', '</li><li>', '</li></ul>'); ?>
        </div>
      <?php endif; ?>

      <!--著者-->
      <div class="article-author">
        <i class="material-symbols-outlined">account_circle</i>
        <?php the_author(); ?>
      </div>
    </div>

  </article>

<?php endif; ?>
各要素の記述が完了したら、一度ブラウザを更新して要素がきちんと入ったかを確認してみましょう。
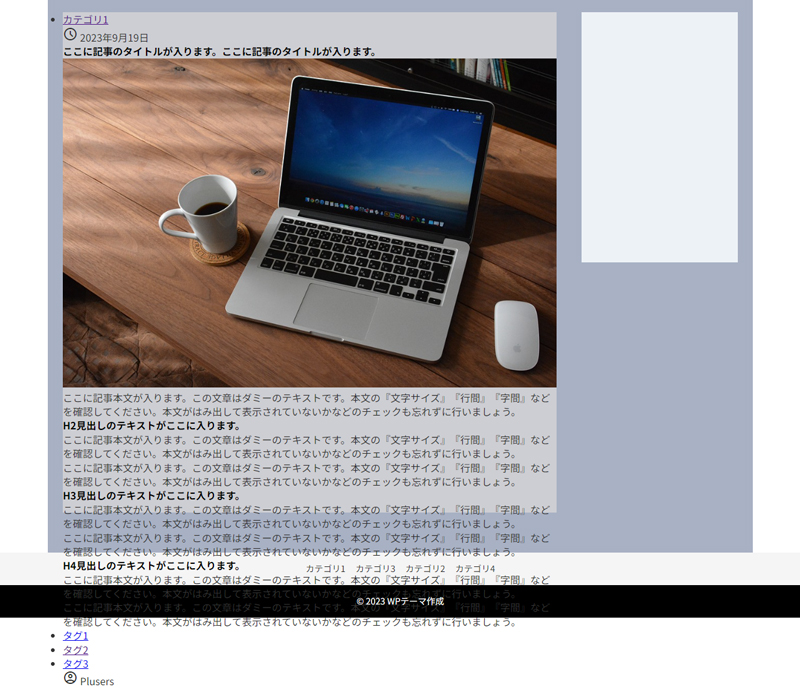
要素の記述が間違いなければ、上記の画像のように各要素が出力されます。
※要素がフッターからはみ出てますが確認用CSSでheightを固定しているからです。削除すれば正常に表示されます。
single.phpを構成する各要素
投稿を構成する各要素は、Wordpressに元々用意されている関数を利用して出力します。今回、投稿の要素を出力するために使用した要素は下記の通りです。
メインループ
<?php if(have_posts()): the_post(); ?>

~投稿コンテンツの中身~

<?php endif; ?>
メインループは、現在の投稿情報をセットアップするために使用します。『the_post()』で投稿をセットしないと、各要素のデータを取得できないため必ず記述してください。
カテゴリー
<?php
if(has_category()):

  echo get_the_category_list(' ');

endif;
?>
『has_category()』は、カテゴリーがセットされている場合はtrueを返す関数です。カテゴリーが設定されていない場合に、処理をスキップするためにif関数と組み合わせて条件分岐を行っています。
『get_the_category_list(”)』は、セットしているカテゴリをすべてリンク付きで取得する関数です。引数に空文字『”』を入れるとhtmlのリスト形式『<ul><li></li></ul>』で出力されます。分かりづらいですが、サンプルコードでは半角スペース『’ ‘』を指定しています。
この関数は記述するだけでは出力されないため必ずphpの『echo』を使って出力してください。
投稿日
<?php echo get_the_date( 'Y-m-d' ); ?>記事が投稿された日付を取得します。表示形式を変更したい場合は、管理画面の『設定』→『一般』→『日付のフォーマット』を変更するか、関数の引数に任意の日付のフォーマットを入力しましょう。
投稿のタイトル
<?php the_title(); ?>投稿のタイトルを出力します。
サムネイル(アイキャッチ)画像
<?php
if(has_post_thumbnail()) {
  the_post_thumbnail('large');
}
?>
『has_post_thumbnail()』は、サムネイルセットされている場合はtrueを返す条件分岐です。サムネイルが設定されていない場合に、処理をスキップするためにif関数と組み合わせて条件分岐を行っています。
『the_post_thumbnail()』は、imgタグ(<img src=”~”>)付きでサムネイル画像のURLを出力します。引数をセットすることで任意のサイズを指定することもできます。(thumbnail, medium, large, full)
投稿の本文
<?php the_content(); ?>投稿の本文を出力します。
旧エディタ(TinyMCE)を使用した場合やクラシックブロックを使用した場合は、投稿の内容に自動補正(<p>などを追加)を行い出力します。自動補正をせずに、エディタで編集した内容をそのまま出力したい場合は、『<?php echo get_the_content(); ?>』というWordPress関数を使用して出力してください。
タグ一覧
<?php
if(has_tag()):
  the_tags('<ul><li>', '</li><li>', '</li></ul>');
endif;
?> ?>
『has_tag()』は、タグがセットされている場合はtrueを返す関数です。タグが設定されていない場合に、処理をスキップするためにif関数と組み合わせて条件分岐を行っています。
『the_tags(‘<ul><li>’, ‘</li><li>’, ‘</li></ul>’)』は、セットしているタグをすべてリンク付きのリスト形式で出力する関数です。上記のように引数をセットすることで、HTMLのリスト形式で出力することができます。
投稿者
<?php the_author(); ?>投稿者を出力する関数です。投稿者名のデフォルトは、WordPressのユーザーIDと同じになっているため、必ず『管理画面 > ユーザー』から『ニックネーム』とブログ上の表示名を変更しておきましょう。
投稿のデザインをCSSで反映する
『WordPressテーマ作成2』で作成したデザインをベースにCSSを整えていきましょう。
CSSで記述を始める前に、要素を確認するため指定しているカラーと高さの一時設定を、すべて非表示もしくは削除してください。
エディタ部分以外の箇所のCSS
まずは、エディタ部分以外の箇所のCSSを記述していきます。
style.cssに記述
.article-head .article-info {
  margin-bottom: .5rem;
}

.article-head .article-info .article-cat {
  display: inline-block;
  vertical-align: middle;
}

.article-head .article-info .article-cat a {
  font-size: .875rem;
  line-height: 1;
  display: inline-block;
  margin-right: .5rem;
  padding: .375rem .5rem;
  text-decoration: none;
  color: #fff;
  background-color: #03162f;
}

.article-head .article-info .article-date {
  font-size: 1rem;
  display: inline-block;
  vertical-align: middle;
  color: #888;
}

.article-head .article-info .article-date i {
  font-size: 1.25rem;
  position: relative;
  top: .25rem;
}

.article-head h1 {
  font-size: 2.125rem;
  margin: 0 0 2rem;
  letter-spacing: 1px;
}

.article-head .article-img {
  margin-bottom: 2rem;
}

.article-head .article-img img {
  display: block;
}

.article-foot .article-tag {
  margin-bottom: 1rem;
  text-align: right;
}

.article-foot .article-tag ul {
  list-style: none;
}

.article-foot .article-tag ul li {
  font-size: .9rem;
  display: inline-block;
  margin-right: .5rem;
  vertical-align: middle;
}

.article-foot .article-tag ul li:last-child {
  margin-right: 0;
}

.article-foot .article-tag ul li a {
  line-height: 1;
  display: block;
  padding: .25rem .5rem;
  text-decoration: none;
  color: #000;
  border: 1px solid #000;
}

.article-foot .article-tag ul li a:hover {
  opacity: .6;
}

.article-foot .article-author {
  font-weight: 500;
  line-height: 1;
  text-align: right;
  vertical-align: middle;
}

.article-foot .article-author i {
  font-size: 1.25rem;
  position: relative;
  top: .25rem;
}

@media(max-width: 480px) {
  .article-head h1 {
    font-size: 1.75rem;
  }
}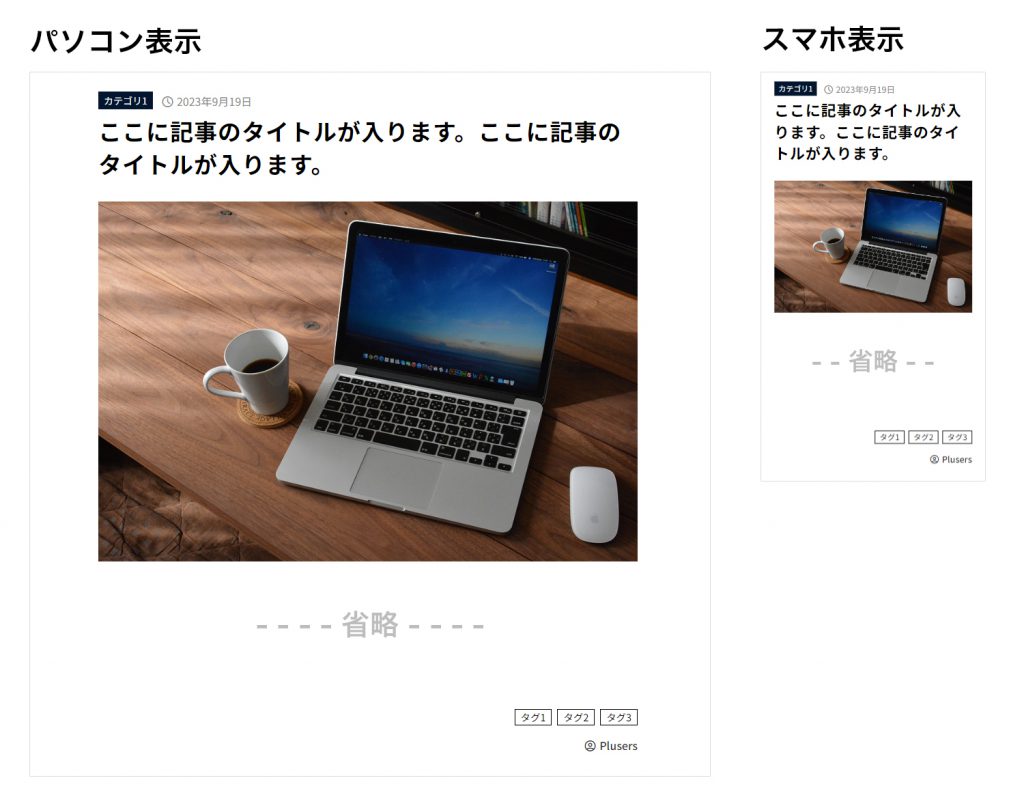
デモのCSSをそのまま記述して表示すると、上の画像のようなデザインになります。スマートフォン表示の場合は、投稿タイトルであるh1のみサイズ調整していますが、バランスをみて他の要素も調整してください。
エディタ部分(本文)のCSS
WordPressのエディタは、現在もブロックエディタ(Gutenberg)とクラシックエディタ(TinyMCE)が両方使用されているのが現状です。
各エディタごとに独自に設定する必要のあるブロックや項目もそれぞあれあるかと思いますが、デモでは各ブロック・項目ごとのデザイン・CSSの詳細は割愛し、両方のエディタで使える基本的なものだけご紹介します。
style.cssに記述
.editor-content p code,
.editor-content p img,
.editor-content p iframe,
.editor-content p object,
.editor-content figure img,
.editor-content figure iframe,
.editor-content figure video,
.editor-content figure audio,
.editor-content pre code {
  margin-bottom: 0;
}

.editor-content th,
.editor-content td {
  border-color: #ddd;
}

.editor-content p,
.editor-content ul,
.editor-content ol,
.editor-content table,
.editor-content dl,
.editor-content blockquote,
.editor-content pre,
.editor-content code,
.editor-content img,
.editor-content picture img,
.editor-content figure,
.editor-content iframe,
.editor-content object,
.editor-content hr,
.editor-content video,
.editor-content audio {
  margin-bottom: 2.5em;
  letter-spacing: 1px;
}

.editor-content b,
.editor-content strong {
  font-weight: bold;
}

.editor-content a {
  text-decoration: underline;
}

.editor-content ul:not([class]) {
  padding-left: 1.25em;
  list-style: disc;
}

.editor-content ol:not([class]) {
  padding-left: 1.875em;
  list-style: decimal;
}

.editor-content table {
  width: 100%;
}
.editor-content table thead {
  border: none;
}
.editor-content table th,
.editor-content table td {
  box-sizing: border-box;
  padding: .625em;
  text-align: left;
  vertical-align: middle;
  border: 1px solid #ddd;
}
.editor-content img,
.editor-content iframe,
.editor-content object,
.editor-content video,
.editor-content audio {
  line-height: 1;
}
.editor-content figure {
  max-width: 100%;
}

.editor-content iframe,
.editor-content object {
  width: 100%;
}

.editor-content blockquote {
  line-height: 1.5;
  position: relative;
  padding: 3.125em 1.875em .625em;
  color: #555;
  background-color: #f1f4f4;
}

.editor-content blockquote::before {
  font-family: "Material Symbols Outlined";
  font-size: 1.875em;
  font-weight: 900;
  position: absolute;
  top: .3125em;
  left: .9375em;
  content: "\e244";
  color: #ccc;
}

.editor-content blockquote p,
.editor-content blockquote cite {
  margin-bottom: 1em;
}

.editor-content blockquote p cite {
  margin-bottom: 0;
}
.editor-content blockquote cite {
  font-size: .6125em;
  display: block;
  text-align: right;
}

.editor-content h2,
.editor-content h3,
.editor-content h4,
.editor-content h5 {
  margin: 3rem 0 2rem;
  letter-spacing: 1px;
}

.editor-content h2 {
  font-size: 1.875rem;
  padding: .75rem 0;
  border-bottom: solid 5px #03162f;
}

.editor-content h3 {
  font-size: 1.5rem;
  padding: 0 1rem;
  border-left: solid .375rem #415671;
  background: transparent;
}

.editor-content h4 {
  font-size: 1.25rem;
}

.editor-content h5 {
  font-size: 1.125rem;
}

@media (max-width: 480px) {
  .editor-content p,
  .editor-content ul,
  .editor-content ol,
  .editor-content table,
  .editor-content dl,
  .editor-content blockquote,
  .editor-content pre,
  .editor-content code,
  .editor-content img,
  .editor-content picture img,
  .editor-content figure,
  .editor-content iframe,
  .editor-content object,
  .editor-content hr,
  .editor-content video,
  .editor-content audio {
    margin-bottom: 1.5em;
  }

  .editor-content th,
  .editor-content td {
    padding: .625em;
  }

  .editor-content blockquote {
    padding: 2.5em 1.875em 1.875em;
  }

  .editor-content blockquote::before
  .editor-content blockquote::after {
    font-size: 1.25em;
  }

  .editor-content blockquote p,
  .editor-content blockquote cite {
    margin-bottom: .625em;
  }

  .editor-content h2,
  .editor-content h3,
  .editor-content h4,
  .editor-content h5 {
    margin: 2rem 0;
  }

  .editor-content h2 {
    font-size: 1.5rem;
  }
  .editor-content h3 {
    font-size: 1.375rem;
  }
  .editor-content h4 {
    font-size: 1.25rem;
  }
  .editor-content h5 {
    font-size: 1rem;
  }
  .editor-content h6 {
    font-size: .9375rem;
  }
}


@media (max-width: 332px) {
  .editor-content h2 {
    font-size: 1.25rem;
  }
  .editor-content h3 {
    font-size: 1.125rem;
  }
  .editor-content h4 {
    font-size: 1rem;
  }
  .editor-content h5 {
    font-size: .9375rem;
  }
  .editor-content h6 {
    font-size: .875rem;
  }
}
上記でご紹介した以外にも、様々なブロックや要素がWordPressには用意されていますので、作成するテーマに合わせて適宜CSSを追加してください。
CSSを反映したら下記のようにエディタ部分にもCSSが追加されます。
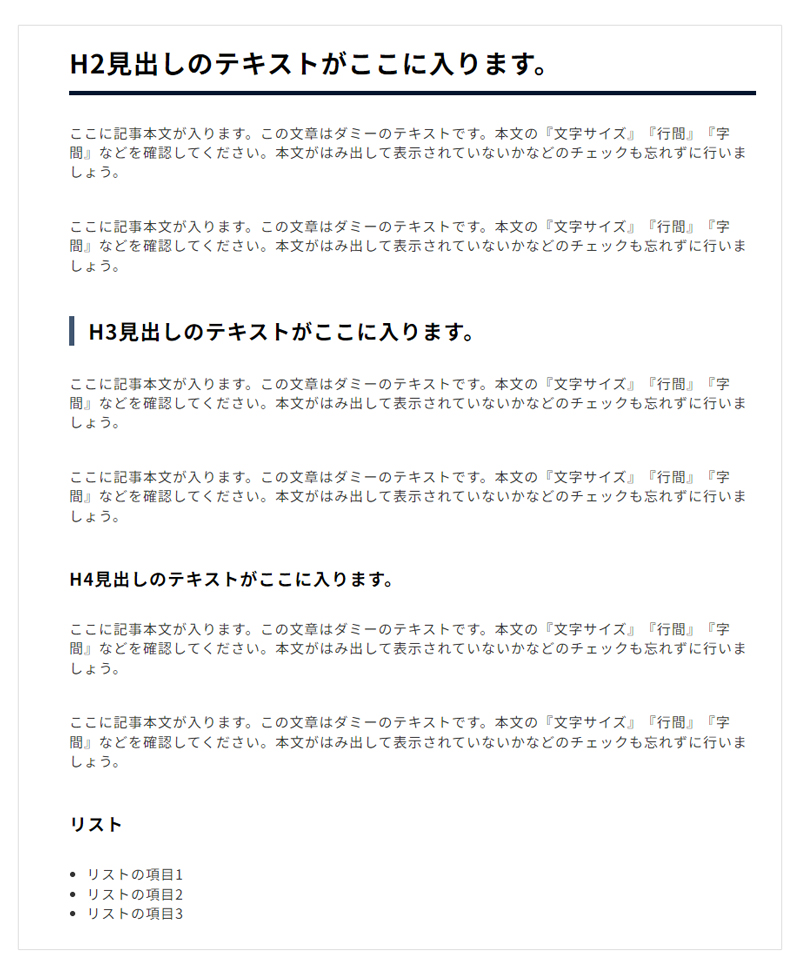
以上で、メイン部分の作成は完了です。続いてサイドバー部分を作成しましょう。
サイドバーでウィジェットを有効化する
サイドバーは、wordpressにデフォルトで搭載されているウィジェットの機能を有効化して作成します。まずは、『functions.php』でウィジェット機能を有効化しましょう。
『functions.php』への記述を行わないと、WordPressの管理画面上にウィジェットの操作画面が表示されずに、使えない状態になっているので注意してください。
functions.phpに記述
function widgetarea_init() {
  register_sidebar(array(
    'name'=>'サイドバー',
    'id' => 'side-widget',
    'before_widget'=>'<div id="%1$s" class="%2$s sidebar-wrapper editor-content">',
    'after_widget'=>'</div>',
    'before_title' => '<h4 class="sidebar-title">',
    'after_title' => '</h4>'
  ));
}
add_action('widgets_init', 'widgetarea_init');
新たに『widgetarea_init()』という関数を作成し、アクションフック『widgets_init』を使ってWordpressで実行されるようにします。
ウィジェットエリアは『register_sidebar()』を使用して追加することができます。
引数『before_widget』内のhtmlのclass内に記述している『editor-content』はエディタ部分のCSSをウィジェットブロックにも適応させるために記述しています。コンテンツのブロックエディタ部分とウィジェトのブロックエディタ部分のCSSを完全に分ける場合は外してください。
『widgetarea_init()』関数内に複数の『register_sidebar()』を定義することで、複数のウィジェットエリアを有効化することができるため、用途やページに合わせてウィジェットエリア有効化してください。
ウィジェットエリアを追加するWordPress関数『register_sidebar』
『<?php register_sidebar( array(~) ); ?>』は、WordPressのウィジェットを追加する関数です。関数の各パラメータは配列『array()』の中で値を指定します。各値の詳細は、下記の通りです。
- name
- ウィジェットエリアに名前を指定します。ここに記述した名前が管理画面のウィジェット選択画面に表示されます。
- id
- ウィジェットエリアのidを指定します。ここで指定したいidは、ウィジェットエリアを呼び出しすときにも使用します。
- before_widget / after_widget
- ウィジェットの前と後ろに要素を置きたい場合に値を指定します。今回は、ウィジェットアイテムの種類別に別々のid・class名が反映されるように『id=”%1$s”』『class=”%2$s”』と記述すると各ウィジェットごとの名前が反映されます。
- before_title / after_title
- 各ウィジェットにタイトルが付けられた場合のタグを設定できます。
※旧ウィジェット機能で主に参照されます。
functions.phpでウィジェットの有効化が完了したら、WordPressの管理画面上でウィジェットが設定できるようになります。
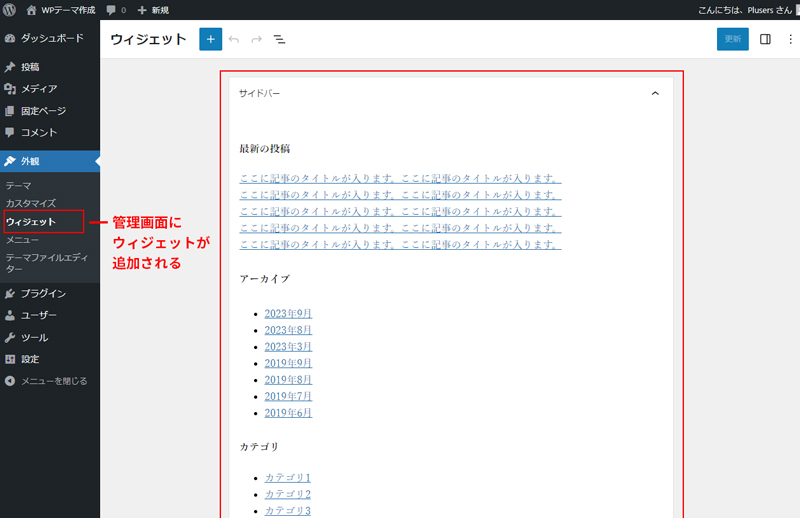
有効化を確認するのと同時にいくつかウィジェットをWordPressの管理画面から挿入しておきましょう。
サイドバーウィジェットを出力する
管理画面でウィジェットが有効化され、いくつかのウィジェットを追加したら、sidebar.phpにウィジェットが表示されるように要素を追加しましょう。
sidebar.phpのsidebar-innerの中に記述
<?php dynamic_sidebar('side-widget'); ?>『dynamic_sidebar』の引数には、functions.phpで設定したウィジェットの『id』を記述してください。
sidebar.phpへの記述が完了したら、きちんと出力されているか確認しましょう。
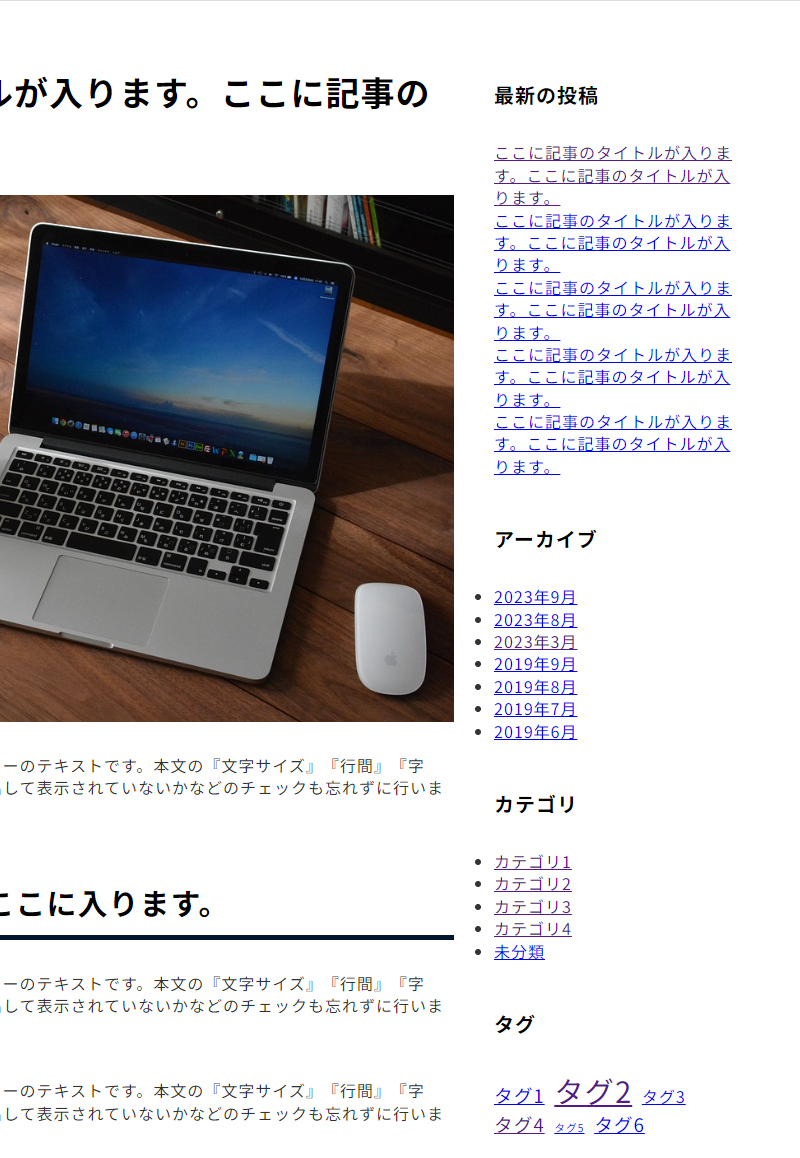
上記のようにサイドバーの要素が出力されたら完了です。
サイドバーのデザインをCSSで反映する
WordPressのウィジェットもエディタと同様に、ブロックウィジェットと旧ウィジェットの両方で運用されています。
現行のブロックウィジェットと旧ウィジェットは、ほぼ別物のパターンが多いので旧ウィジェットにも対応させる場合は、基本的には別でCSSを記述する必要があると考えておきましょう。
デモでは各ブロック・ウィジェットごとのデザイン・CSSは割愛し、ブロックウィジェットと旧ウィジェット両方に適応される基本的なものだけをご紹介します。
style.cssに記述
.sidebar-wrapper {
  margin-bottom: 2rem;
}

.sidebar .sidebar-title,
.sidebar .wp-block-heading {
  font-size: 1.125rem;
  font-weight: 600;
  line-height: 1.4;
  margin: 0 0 1rem;
  padding: .375rem;
  letter-spacing: 1px;
  border: 0;
  border-bottom: .1875rem solid #1d2d43;
}

.sidebar a {
  text-decoration: none;
  color: #333;
}

.sidebar ul {
  list-style: none;
}

.sidebar li {
  border-bottom: 1px solid #ddd;
}

.sidebar li a {
  display: block;
  padding: .5rem;
}

.sidebar select {
  display: block;
  width: 100%;
  padding: .5rem;
  border: 1px solid #ddd;
}
ブロックウィジェットの各ブロックは本文のブロックエディタと基本的に共用となっているため、CSSでデザインを追加する際にセレクタの書き方(.wp-block-〇〇のみをセレクタにするなど)によっては、投稿本文の部分にも影響が出てしまう場合があるので注意してください。
各ブロックのデザインを行う際は、共通で反映する各ブロックのCSS → 投稿本文のみに反映するCSS → ウィジェットのみに反映するCSS の順で作成していくと良いかと思います。
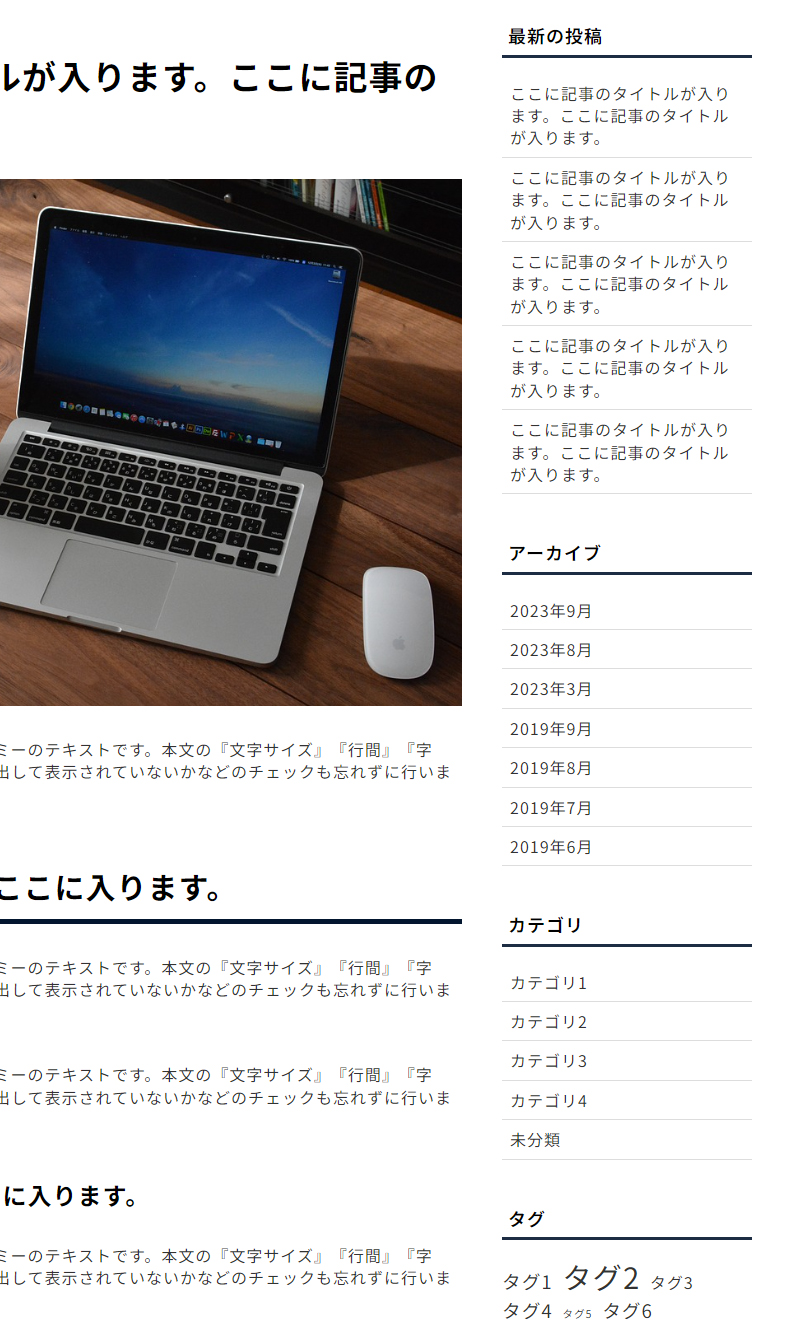
CSSをそのまま反映すると、上記の画像のようになります。上記に加えて適宜ブロック・ウィジェット用のCSSを追加してください。
以上で、デモでの投稿ページの作成は完了です。
page.phpに固定ページの各要素を追加する
投稿の作成が終わったら、続いて固定ページを作成しましょう。
固定ページは、投稿と違い『お問い合わせ』や『プライバシーページ』などの流動的ではないページを作成するページなので、投稿の流動的な要素を省いていくイメージで作成します。
page.phpの<div class=”wrapper”>タグ内を編集
<article>

  <div class="page-title-wrap">
    <div class="page-title">
      <div class="text-warp">
        <h1><?php the_title() ?></h1>
      </div>
    </div>
  </div>

  <div class="container fixed-page">
    <div class="contents">

    <?php if(have_posts()): the_post(); ?>

      <div class="article-main editor-content">

        <?php the_content(); ?>

      </div><!--end article-main-->

    <?php endif; ?>

    </div><!--end contents-->
  </div><!--end container-->

</article>
骨組みの状態では、『<div class=”wrapper”>』の直下に『<div class=”container”>』を配置していたのですが、間に記事のまとまりであることを示す『<article>』タグを挿入し、その直下に新たにタイトル要素を追加します。
※ページタイトルの背景色をブラウザ幅いっぱいに反映したいので、『<div class=”container”>』の外に配置しています。
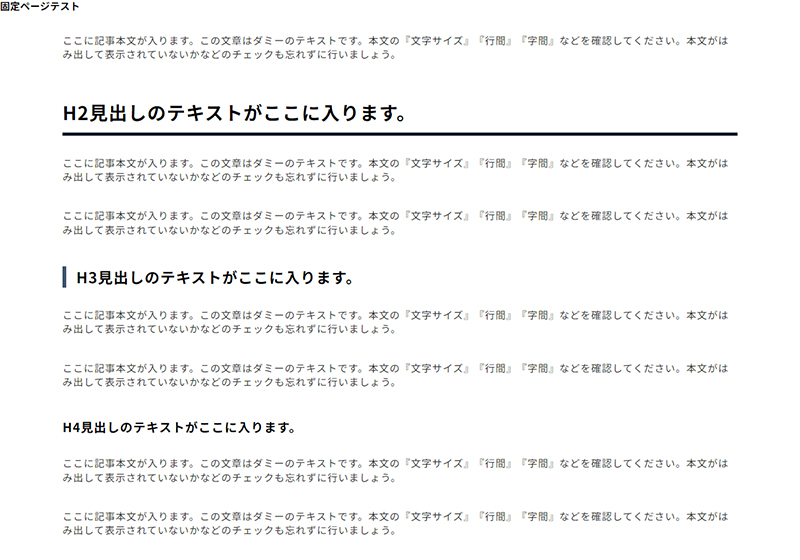
各要素の記述が完了したら、一度ブラウザを更新して要素がきちんと入ったかを確認してみましょう。要素の記述が間違いなければ、上記の画像のように各要素が出力されます。
ページタイトルのデザインをCSSで反映する
固定ページのコンテンツ部分に関しては、投稿のブロックエディタ部分と同じCSSが適応されるためページタイトル部分のCSSのみ追加します。
style.cssに記述
.page-title-wrap {
  background-color: #1d2d43;
}

.page-title-wrap .page-title {
  position: relative;
  max-width: 1080px;
  height: 22rem;
  margin: 0 auto 2rem;
  padding: 0 1.5rem;
}

.page-title-wrap .page-title .text-warp {
  position: absolute;
  top: 50%;
  left: 1.5rem;
  width: calc(100% - 3rem);
  transform: translateY(-50%);
  text-align: center;
}

.page-title-wrap .page-title .text-warp h1 {
  font-size: 3rem;
  font-weight: 400;
  letter-spacing: 1px;
  color: #fff;
}

@media(max-width: 820px) {
  .page-title-wrap .page-title {
    height: 20rem;
    margin-bottom: 1rem;
  }

  .page-title-wrap .page-title .text-warp h1 {
    font-size: 2.75rem;
  }
}

@media(max-width: 480px) {
  .page-title-wrap .page-title {
    height: 12rem;
    margin-bottom: 0;
  }

  .page-title-wrap .page-title .text-warp h1 {
    font-size: 2rem;
  }
}
ページタイトルは、背景色を全画面に表示し上下左右中央揃えでタイトルを表示します。
タイトルテキストの上下揃えは『position: absolute』と『transform: translateY(-50%)』の組み合わせで改行されたりや高さが変わったりした場合も自動的に調整されるようにしています。
タイトルの背景の高さは、ブラウザの幅が変わっても高さはそのままの仕様にしていますが、ブラウザ幅に合わせて流動的に高さを変更する場合は『.page-title-wrap .page-title』のheightを『vw』で指定してください。
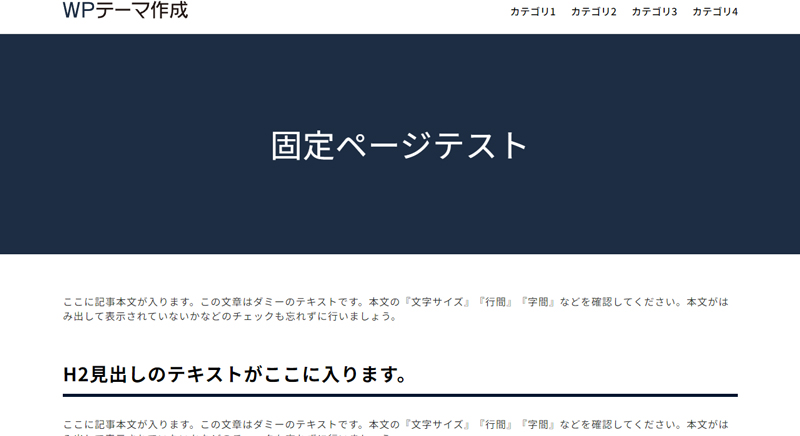
デモのページタイトルのCSSを反映すると上記のように反映されます。
以上で、WordPressテーマの投稿と固定ページの構築は完了です。次の記事では、カテゴリやタグごとの記事の一覧を表示する、アーカイブページの作成方法をご紹介します。
下記より記事で作成したところまでのテーマファイルを下記よりダウンロードできます。
